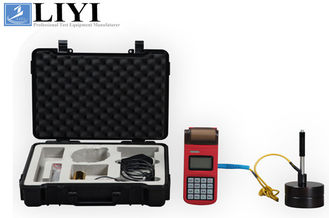
Leeb Portable Hardness Testing Machine 0° ~ 360° Measuring Direction
Leeb hardness tester according to the Leeb hardness measurement principle can be easily and quickly
measure a variety of metal materials, and instantly display the value of measured hardness. And it can
swiftly convert the hardness value in different hardness scales.
ADVANTAGES:
1. Wide measuring range. Based on the principle of Leeb hardness testing theory. It can measure the Leeb
hardness of all metallic materials.
2. Large screen LCD, showing all functions and parameters.With EL background light.
3. Seven impact devices are available for special application. Automatically identify the type of impact
devices.
4. Test at any angle, even upside down.
5. Direct display of hardness scales HRB, HRC, HV, HB, HS, HL.
6. Large memory could store 100 groups (Relative to average times 32~1 ) information including single
measured value, mean value, impact direction, impact times, material and hardness scale etc.
7. Battery information showing the rest capacity of the battery and the charge status.
8. User calibration function.
9. Software to connect to PC via USB port.
10. Thermal printer integrated, convenient for in field printing.
11. NI-MH rechargeable battery as the power source. Charge circuit integrated inside the instrument.
Continuous working period of no less than 150 hours (EL off and no printing).
12. Auto power off to save energy.
13. Outline dimensions:212mm×80mm×32mm
Error and repeatability of displayed value see Table1-1 below.
Table 1-1
|
No.
|
Type of impact device
|
Hardness value of Leeb standard
hardness block
|
Error of displayed value
|
Repeatability
|
|
1
|
D
|
760±30HLD
530±40HLD
|
±6 HLD
±10 HLD
|
6 HLD
10 HLD
|
|
2
|
DC
|
760±30HLDC
530±40HLDC
|
±6 HLDC
±10 HLDC
|
6 HLD
10 HLD
|
|
3
|
DL
|
878±30HLDL
736±40HLDL
|
±12 HLDL
|
12 HLDL
|
|
4
|
D+15
|
766±30HLD+15
544±40HLD+15
|
±12 HLD+15
|
12 HLD+15
|
|
5
|
G
|
590±40HLG
500±40HLG
|
±12 HLG
|
12 HLG
|
|
6
|
E
|
725±30HLE
508±40HLE
|
±12 HLE
|
12 HLE
|
|
7
|
C
|
822±30HLC
590±40HLC
|
±12 HLC
|
12 HLC
|
1. Measuring range:HLD(170~960)HLD
2. Measuring direction:0°~360°Hardness Scale:HL,HB,HRB,HRC,HRA,HV,HS
3. Display:segment LCD
4. Data memory:500 groups max.(relative to impact times 32~1)
5. Printing paper: width is (57.5±0.5)mm, diameter is 30mm.
6. Battery pack: 6V NI-MH
7. Battery charger: 9V/500mA
8. Continuous working period:about 150 hours(With backlight off, no printing)
9. Communication interface:USB1.1
Photo Reference


 Your message must be between 20-3,000 characters!
 Please check your E-mail!
  Your message must be between 20-3,000 characters!
 Please check your E-mail!


